Nude lipstick is the ultimate makeup essential—it’s timeless, versatile, and effortlessly chic. But ask anyone who’s ever worn it, and they’ll tell you the same thing: getting nude lipstick to look smooth and last long is a challenge. From patchy application and feathering to fading within hours, the struggle is real. The secret to perfect Prep Nude Lipstick lips isn’t just about the lipstick you choose—it’s about how you prep. Proper preparation creates the ideal canvas, ensuring your lipstick applies evenly, stays put, and looks impeccable all day.
Whether you’re choosing a Soft Nude Lipstick for a natural look or a Caramel Nude Lipstick for warmth, the right prep makes all the difference. In this comprehensive guide, we’ll walk you through the exact steps you need to take before applying any nude shade.
Why Prep Nude Lipstick Is Different
Nude lipstick is uniquely unforgiving. Unlike bold reds or deep berries, which can mask minor imperfections, nude shades closely match your natural skin tone. Prep Nude Lipstick.This means any dryness, flakiness, or uneven texture becomes instantly noticeable. Without proper prep, even the perfect shade—whether it’s a Cool Nude Lipstick or a Warm Nude Lipstick—can settle into fine lines and fade unevenly.
Understanding Lipstick Color Theory is key here. The way a color interacts with your skin’s undertone starts with the canvas you provide. A flaky, dry base will distort any shade, making even the most universally flattering Neutral Nude Lipstick look off.
Step 1: Cleanse & Analyze Your Natural Lip Color
Start with a completely clean slate. Gently wipe away any residue with a micellar water or soft cloth. This is the perfect time to assess your natural lip color in good light. Prep Nude Lipstick.Are your lips more pink, peach, or brown? This analysis is the first step in our guide to How to pick the perfect lipstick shade for your skintone, helping you determine if you should lean towards a Pink Nude Lipstick or a Brown Nude Lipstick.
Step 2: Exfoliate for a Perfectly Smooth Base
This is the most critical step. Exfoliation removes the dead skin cells that cause patchiness. This is non-negotiable for any finish, but especially for matte formulas like a long-wearing Deep Nude Lipstick.
How to Exfoliate Correctly:
- Use a Gentle Scrub: A homemade mix of sugar and honey or a store-bought option works perfectly.
- Massage in Circles: Focus on the center of your lips Prep Nude Lipstick where dryness is most common.
- Rinse and Pat Dry: Never rub, as this can cause irritation.
A smooth base ensures that sophisticated shades like Taupe Nude Lipstick or Mocha Nude Lipstick apply with even, modern sophistication.
Step 3: Hydrate Deeply, But Don’t Overdo It
Hydration plumps the lips and prevents the color from cracking. Prep Nude Lipstick. However, too much product will create a slippery base that prevents adhesion.
The Hydration Balance:
- Apply a Nutrient-Rich Balm: Look for shea butter or hyaluronic acid. Let it sink in for a full 5 minutes.
- The Blot Test: Before applying color, gently blot your lips with a tissue. If you see a noticeable transfer of balm, blot again. Your lips should feel supple, not slick.
This step is crucial for shades that rely on a healthy glow, like Honey Nude Lipstick or Peach Nude Lipstick.
Step 4: Prime to Perfect and Prevent Feathering
A lip primer creates a tacky, even surface for color to grip. Prep Nude Lipstick.It fills in fine lines around the lip border, which is essential for preventing lighter shades like Beige Nude Lipstick or Sand Nude Lipstick from feathering.
Pro Tip: If you don’t have primer, a tiny dab of foundation patted onto the lips works as a great base. It also helps neutralize your natural lip pigment, allowing the true color of your Rosy Nude Lipstick or Almond Nude Lipstick to shine through.
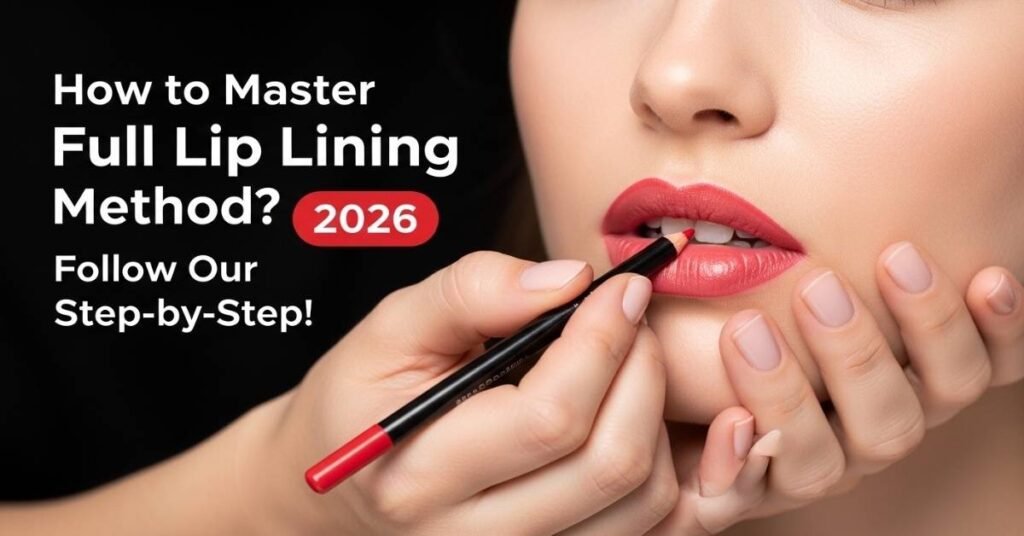
Step 5: Line with Precision for Definition & Longevity
Lip liner is your best friend for longevity. It acts as a barrier against feathering and provides a base color that remains even as your lipstick fades.
Lining for Nude Lips:
- Match Your Lipstick: For a seamless look, choose a liner that matches your Nude Lipstick Shades perfectly.
- Outline and Fill: Trace your natural lip line, then lightly fill in the entire lip. This technique is a game-changer for making your Latte Nude Lipstick last through coffee breaks.
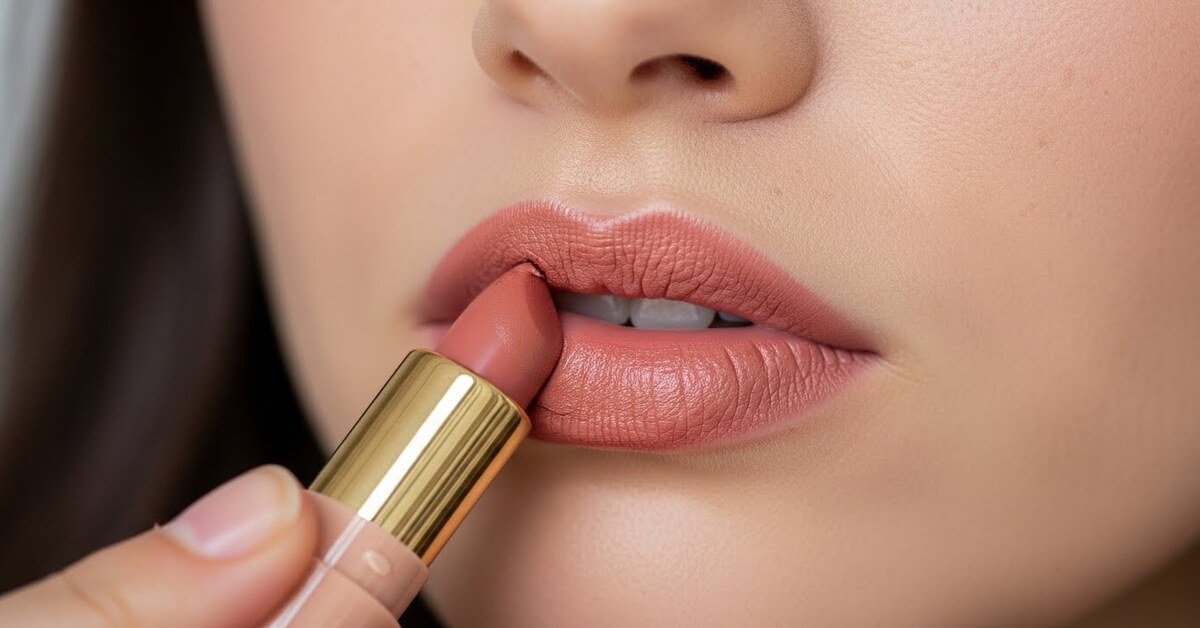
Step 6: Apply with Strategy for Flawless Finish
Now for the main event. The application method can make or break the look.
Best Practices:
- Use a Brush for Precision: This is especially helpful for bolder nudes like Cocoa Nude Lipstick, ensuring clean, defined edges.
- The Blot-and-Layer Technique: Apply your first thin layer, blot with a tissue, then apply a second. This “sets” the first layer, dramatically increasing wear time for any shade, from a Dusty Nude Lipstick to a classic Caramel Nude Lipstick.
Step 7: The Final Lock: Setting for All-Day Wear
To truly make your nude lipstick last, you need to set it without altering the finish.
The Professional’s Setting Trick:
- Place a single-ply tissue over your lips.
- Using a fluffy brush, gently dust a tiny amount of translucent powder over the tissue.
- This sets the color in place while keeping the comfortable, creamy feel of your Soft Nude Lipstick intact.
Common Prep Mistakes That Ruin Your Nude Lip
- Skipping Exfoliation: This is the #1 cause of patchy Brown Nude Lipstick.
- Using the Wrong Nude Shade: Even with perfect prep, the wrong undertone will fail. Consult our Nude Lipstick Shades: Full Guide to Finding Your Perfect Nude to avoid this.
- Skipping Liner: This almost guarantees your Neutral Nude Lipstick will feather within an hour.
Conclusion: Prep is the Foundation of Perfect Lips
Mastering these prep steps transforms your relationship with nude lipstick. It turns application from a chore into a ritual and guarantees a flawless result. Remember, the most beautiful Lipstick Shades & Their Meanings start with a perfect canvas. By investing just a few extra minutes in this routine, you ensure that your chosen nude—be it a subtle Almond Nude Lipstick or a statement Deep Nude Lipstick—looks smooth, stays put, and makes you feel confident all day long.
Explore More Nude Lipstick Guides:
- Nude Lipstick Shades: Full Guide to Finding Your Perfect Nude
- How to pick the perfect lipstick shade for your skintone?
- Lipstick Color Theory: The Complete Guide
- Warm Nude Lipstick Shades That Flatter Everyone
- Cool Nude Lipstick: A Guide to the Perfect Shade
- Caramel Nude Lipstick: The Perfect Balance
- Mocha Nude Lipstick: Day to Night Shade
- Lipstick Shades & Their Meanings: A Complete Guide